Optimized Seo Title:comprehensive Guide To Wet Mount Slide Preparation For Microscopy With Key Components And Applications
To prepare a wet mount slide for microscopy, place a liquid drop on a slide, add the specimen, and gently cover it with a coverslip. Use immersion oil for high magnification. Essential components include the slide (specimen support), coverslip (protection), objective lens (magnification), condenser (light concentration), diaphragm (light regulation), and stage (specimen positioning). By following these steps and leveraging the microscope’s components, researchers can create wet mount slides to visualize specimens in various fields.
Unveiling the Microcosm: The Essential Role of Wet Mount Slides in Microscopy
Prepare yourself to be captivated as we embark on an enthralling journey into the realm of microscopy. At the heart of this fascinating exploration lies a fundamental tool that opens up a hidden world of wonder: the wet mount slide. These unsung heroes play an indispensable role in enabling us to visualize and examine specimens, unlocking the secrets that lie within the unseen.
Wet mount slides are the gateway to a microscopic odyssey. They allow us to suspend specimens in a liquid medium on a glass slide, ensuring that they remain hydrated and preserving their native state. This technique empowers us to delve into the intricate details of cells, microorganisms, and other minuscule objects, revealing their captivating complexity and functioning.
In the hands of scientists, researchers, and students alike, wet mount slides serve as an investigative tool that transcends boundaries. They facilitate the study of living specimens, providing insights into cellular processes, microbial growth, and a myriad of biological phenomena.
A Comprehensive Guide to Preparing Wet Mount Slides: Essential Materials
In the realm of microscopy, wet mount slides serve as indispensable tools, allowing scientists and researchers to visualize and examine specimens with remarkable clarity. Understanding the materials required for their preparation is paramount to achieving optimal microscopy results.
Microscope Slide:
The foundation of a wet mount slide, the microscope slide is a flat, transparent surface upon which the specimen rests. It provides a stable base for the coverslip and helps prevent the evaporation of the liquid medium.
Coverslip:
The coverslip plays a crucial role in protecting the specimen and preventing the evaporation of the liquid medium. It is typically made of thin glass and gently placed over the specimen, creating a sealed chamber that optimizes viewing conditions.
Specimen:
The specimen is the star of the wet mount slide. Whether it be a sample of bacteria, tissue, or another biological material, the specimen is carefully deposited onto the microscope slide, where it will be scrutinized under the microscope.
Immersion Oil (Optional):
Immersion oil is an optional but highly beneficial component for high-magnification observations. It is applied between the objective lens and the coverslip, reducing light refraction and enhancing image quality.
Creating Wet Mount Slides: A Step-by-Step Guide
Wet mount slides are essential tools in microscopy, providing a simple and convenient way to visualize and examine specimens. Whether you’re a seasoned scientist or a curious student, understanding how to prepare these slides is crucial for successful microscopy.
Required Materials:
- Microscope slide
- Coverslip
- Specimen
- Immersion oil (optional)
Step-by-Step Instructions:
Preparing the Slide:
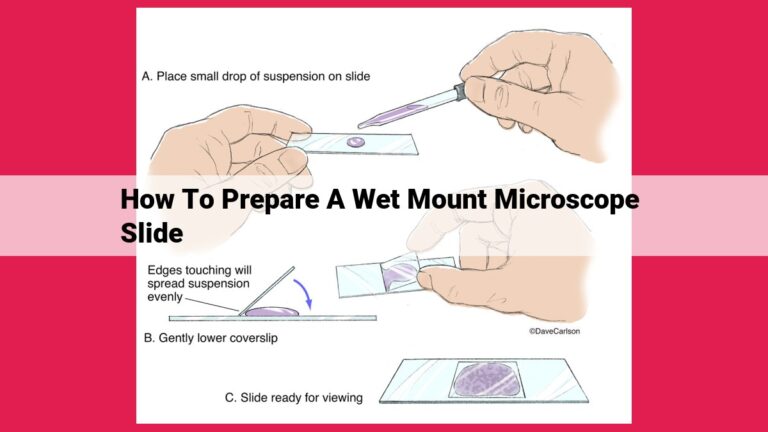
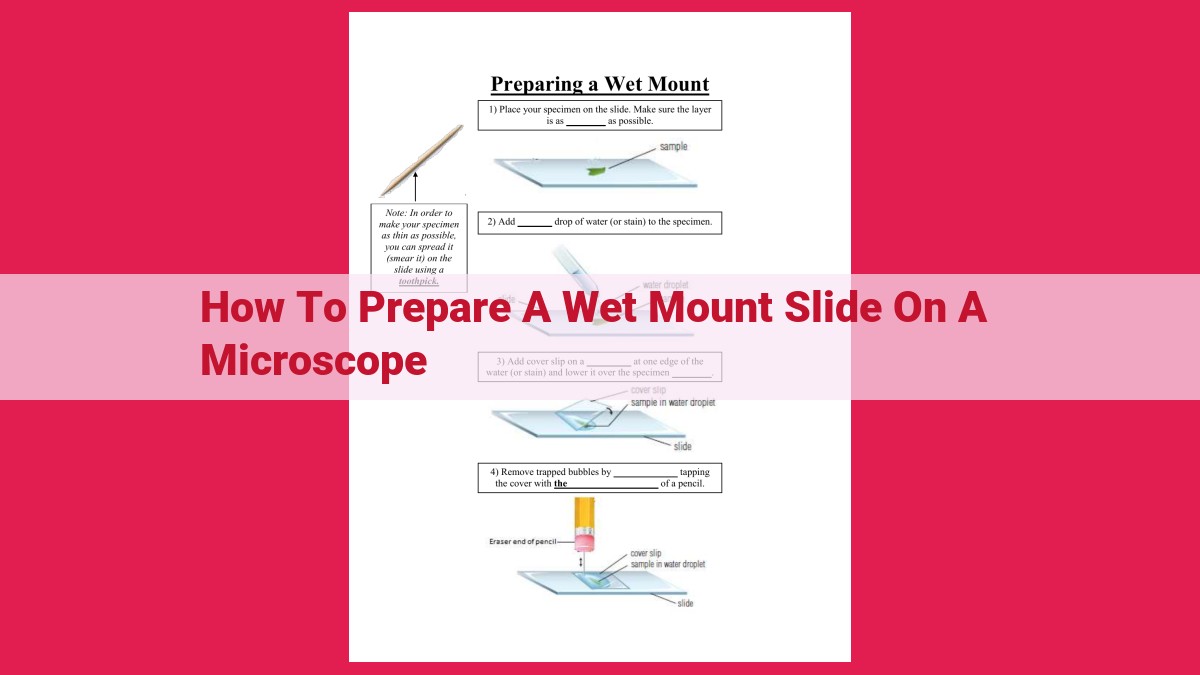
Begin by placing a microscope slide on a flat surface. Using an eyedropper or pipette, add a small drop of liquid to the center of the slide. This liquid can be water, saline, or a specific medium suitable for your specimen.
Adding the Specimen:
Carefully transfer the specimen into the liquid drop using tweezers or a pipette. Avoid touching the specimen with your hands as this can contaminate it.
Covering the Specimen:
Gently place a coverslip over the specimen, ensuring that it completely covers it. Avoid introducing air bubbles and try to keep the coverslip as flat as possible.
Viewing the Specimen:
Position the slide on the microscope stage and focus the light using the condenser. Adjust the diaphragm to optimize illumination and enhance the visibility of your specimen.
Using Immersion Oil (Optional):
For high-magnification observations, you may need to use immersion oil. Apply a small drop of oil between the objective lens and the coverslip. This will improve image quality by reducing light refraction and increasing resolution.
Essential Components of a Microscope:
Understanding the key components of a microscope will enhance your microscopy skills:
- Microscope Slide: Supports the specimen and coverslip.
- Coverslip: Protects the specimen and prevents liquid evaporation.
- Objective Lens: Magnifies the specimen.
- Condenser: Concentrates light on the specimen for improved visibility.
- Diaphragm: Controls light intensity through the specimen.
- Stage: Holds the slide and facilitates precise specimen positioning.
Preparing high-quality wet mount slides is essential for successful microscopy. By following the steps outlined in this guide, you can optimize your results, maximize image quality, and unlock the fascinating world of microscopy. Wet mount slides are widely used in various scientific fields, from biology and medicine to environmental science and engineering, providing valuable insights into the microscopic world.
The Essential Components of a Microscope: Unveiling the Secrets of Microscopic Wonders
Embarking on a journey into the realm of microscopy requires a deep understanding of the intricate components that make this scientific marvel possible. Within the heart of a microscope lies a symphony of precision instruments, each playing a crucial role in illuminating the hidden world of specimens. Let’s delve into the key players that orchestrate the magic of microscopy:
Microscope Slide: The Foundation for Specimen Examination
The microscope slide is the stage upon which your specimen takes center stage. Made of glass or plastic, this rectangular surface provides a stable platform for supporting the specimen and its protective coverslip. Its smooth surface ensures minimal interference with microscopic observations while maintaining specimen integrity.
Coverslip: Shielding Specimens from Evaporation and Environmental Hazards
Gently resting atop the specimen like a protective canopy, the coverslip protects the delicate specimen from evaporation, external contaminants, and accidental damage. This thin glass sheet also flattens the specimen, reducing distortions and enhancing image clarity.
Objective Lens: The Magnification Maestro
The objective lens is the microscope’s magnifying powerhouse, responsible for enlarging the specimen’s image. Positioned beneath the stage, the objective lens comes in varying magnifications, allowing you to explore the intricacies of specimens at different scales.
*Condenser:** Illuminating the Path to Clarity
The condenser acts as the microscope’s lighting director, directing a beam of light onto the specimen. By concentrating the light source, the condenser improves specimen visibility and enhances contrast, revealing even the finest details.
Diaphragm: Regulating Light Intensity for Optimal Contrast
The diaphragm is the microscope’s light intensity regulator. By adjusting the diaphragm’s opening, you can control the amount of light passing through the specimen, enhancing contrast and optimizing image quality. A wider diaphragm opening allows more light, increasing specimen brightness, while a narrower opening reduces light intensity, improving contrast.
Stage: The Precision Platform for Specimen Positioning
The stage serves as the specimen’s stage, providing a stable platform for precise positioning and movement. Its adjustable knobs allow for smooth and accurate specimen navigation, ensuring that the area of interest is perfectly aligned within the field of view.