Mastering Tape Diagrams: A Comprehensive Guide To Enhanced Data Visualization
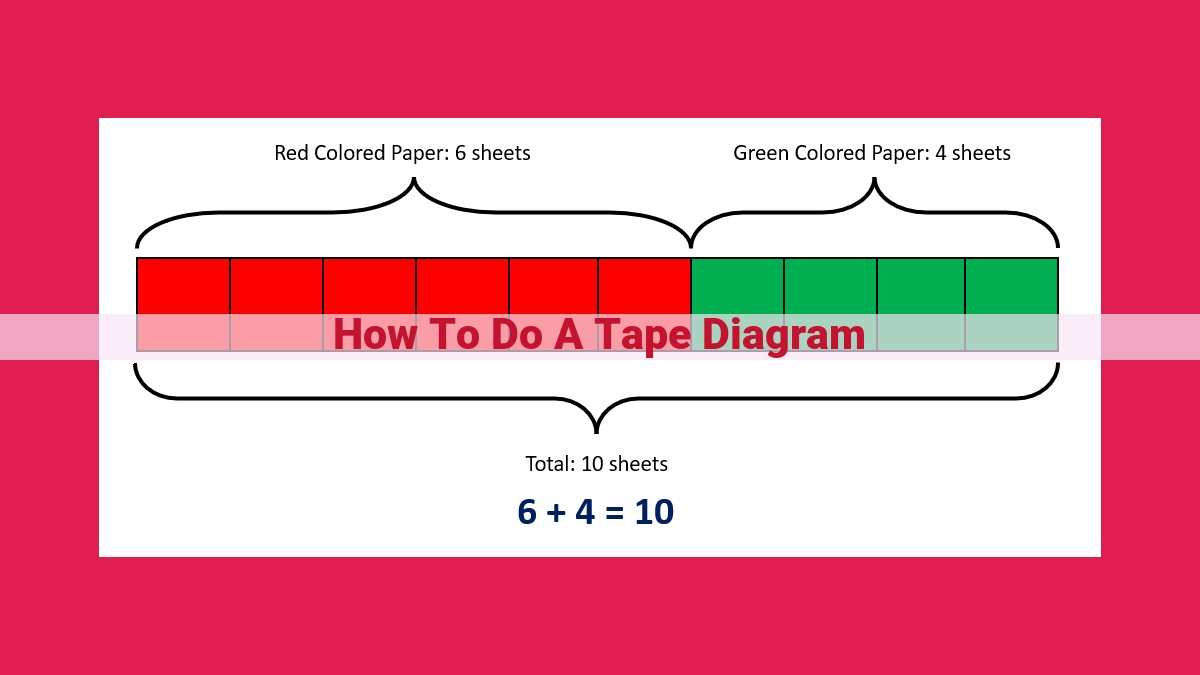
To create a tape diagram: 1) Establish categories and gather data; 2) Draw a vertical line for values and horizontal lines for categories; 3) Create cells by intersecting lines; 4) Label the lines with variables and categories; 5) Fill in cells with data using colors or shading; 6) Analyze data to identify trends and patterns. This visualization method helps visualize relationships between variables by organizing data into intersecting ribbons, providing a clear view of data distribution.
- Define a tape diagram and its purpose.
- Explain its benefits for visualizing data.
Visualize Data with Ease Using Tape Diagrams: A Comprehensive Guide
In the realm of data visualization, tape diagrams emerge as a remarkably effective tool for organizing and presenting complex data in a clear and intuitive manner. These diagrams, also known as frequency tables, offer a straightforward method of displaying data in a grid format, making it easy to identify patterns, trends, and correlations.
Tape diagrams are particularly useful when working with categorical data, which consists of discrete labels rather than numerical values. They allow you to visualize the distribution of data across multiple categories, enabling you to compare and contrast different groups or variables. By arranging data into rows and columns, tape diagrams provide a structured framework for examining relationships and identifying potential insights.
The strength of tape diagrams lies in their ability to visually represent data, making it more accessible and easier to digest. They transform abstract data points into a tangible representation, encouraging a deeper understanding of complex information. By presenting data in a grid format, tape diagrams highlight the interplay between different categories and variables, facilitating a more comprehensive analysis.
In the following sections, we will delve into the step-by-step process of creating a tape diagram, empowering you to effectively organize and visualize your data for maximum impact.
Step 1: Establish the Categories
Unveiling the Essence of Your Data
When embarking on the adventure of creating a tape diagram, the first step is to lay the groundwork by identifying the very essence of your data – the variables that will guide your visualization. These variables, like the characters in a captivating story, each hold a unique role in portraying the insights hidden within your data.
Gathering and Organizing Your Data’s Tale
Once you’ve identified the variables that will star in your tape diagram, it’s time to gather and organize your data into meaningful categories. Think of it as sorting a vibrant bouquet of flowers, arranging them by their vibrant hues and delicate textures. Each category becomes a chapter in the story of your data, adding depth and richness to the visualization.
Example:
Let’s imagine you want to create a tape diagram to understand consumer preferences for different types of coffee. The variable “Coffee Type” would become the star of your visualization, while the categories could include “Espresso,” “Cappuccino,” “Latte,” and “Americano.”
Step 2: Establishing the Y-Axis – Unraveling the Vertical Line
In the tapestry of a tape diagram, the vertical line serves as the backbone, providing structure and order. This line represents the variable we’re investigating, the very essence of our inquiry. Its values, marked with precise tick marks, are the threads that guide our exploration.
Drawing this vertical line is akin to setting a stage, upon which our data will dance. It establishes the range of values, from the nadir of minimums to the zenith of maximums. Each tick mark, like a stepping stone, marks the intervals along this vertical axis. These markings allow us to plot data points with accuracy and precision, ensuring a clear representation of our findings.
The vertical line is not merely a geometric construct but a gateway to understanding. It’s the axis of comparison, against which different categories will be juxtaposed. As we progress in our tape diagram journey, this line will become the anchor point for insights, revealing patterns, trends, and relationships hidden within our data.
Step 3: Create the Horizontal Lines
The next step in creating a tape diagram is to draw the horizontal lines that represent the different categories of your data. These lines will form the X-axis of your diagram.
Remember, the purpose of these lines is to visually represent the different categories of data you’re working with. For example, if you’re creating a tape diagram to show the distribution of students’ grades in a class, your horizontal lines might represent different grade levels (e.g., A, B, C, D, F).
How to Draw the Lines:
To draw the horizontal lines, follow these steps:
- Start by drawing a horizontal line that intersects the vertical line you drew in Step 2 at the bottom. This line will represent the lowest category in your data set.
- Continue drawing horizontal lines above the first line, each one spaced evenly apart. The number of lines you draw will depend on the number of categories in your data set.
- Make sure that the lines are drawn perpendicular to the vertical line, forming a right angle. This will ensure that your diagram is accurate and easy to read.
Once you’ve finished drawing the horizontal lines, your tape diagram will start to take shape. You’ll have a visual representation of the different categories of your data, with each line representing a specific category. This will help you to easily visualize and analyze your data in the next steps.
Step 4: Set Up the Boxes
At the heart of a tape diagram lies a grid of boxes, where each box represents a unique combination of categories. Imagine a crossword puzzle where the vertical line intersects with the horizontal lines, creating a series of cells. Each cell becomes a vessel for data, a place to store the information that will eventually paint a vivid picture of your insights.
Just as in a crossword puzzle, the intersection points of the lines serve as anchors for the cells. Each cell is like a microcosm of your data, holding the values for the categories that intersect at that point. As you progress through the tape diagram, you’re essentially creating a visual tapestry that weaves together the threads of your data.
Think of the boxes as building blocks. With each box you place on the grid, you’re adding another piece to the puzzle, constructing a visual representation of your data. As you fill in each cell, you’re laying the foundation for a compelling story that your tape diagram will ultimately tell.
Step 5: Label the Lines
Labeling the lines in your tape diagram is crucial for making sense of the data you’ve visualized. It’s like putting names to faces – without labels, your audience will struggle to decipher your masterpiece.
Start by labeling the vertical line with the variable you’re analyzing. This is the backbone of your diagram, so choose a term that succinctly describes the data you’re representing. Below the line, mark off the specific values that the variable can take. For instance, if you’re charting the ages of employees in a company, your values might be 20, 30, 40, and so on.
Next, tackle the horizontal lines that represent your categories. These lines are like the spokes on a wheel, connecting different values of the variable to specific groups. Make sure each line is clearly labeled with the corresponding category name. For example, if you’re visualizing the ages of employees in different departments, your categories might be “Sales,” “Marketing,” and “Engineering.”
By labeling your lines, you transform your tape diagram from a confusing maze into a clear and informative visualization. Your audience will now be able to grasp the data you’re presenting and draw meaningful insights from it.
Step 6: Fill in the Boxes:
- Explain how to enter the data into the cells.
- Discuss the use of colors or shading to represent different data values.
Step 6: Filling in the Boxes – Painting a Vivid Data Picture
Now, let’s dive into the exciting part – filling in the boxes! This step transforms your tape diagram into a vibrant tapestry of data, painting a clear picture for your analysis.
Enter the Data:
Each cell in your tape diagram represents a specific combination of categories. This is where the data you’ve meticulously gathered comes into play. Enter the data into each cell, carefully placing it in the corresponding category and value.
Visualizing Values with Colors and Shading:
To enhance the effectiveness of your tape diagram, consider using colors or shading to represent different data values. This visual cue helps you quickly identify patterns and trends. For instance, you could use green for high values, yellow for medium values, and red for low values.
Example:
Imagine a tape diagram visualizing the relationship between customer age and product purchases. You could assign green to customers who made multiple purchases, yellow to those who made a single purchase, and red to those who haven’t purchased yet. This visual representation makes it easy to see which age groups are most likely to engage with your products.
Step 7: Analyzing the Data Tapestry
Once you’ve meticulously constructed your tape diagram, it’s time to embark on its true purpose: unraveling the hidden insights nestled within the data. This step is where the art of visualization meets the science of analysis, transforming raw numbers into a captivating story.
Unveiling Trends and Patterns
Scan the horizontal and vertical lines, seeking out striking patterns and recurring trends. Identify any clusters, gaps, or deviations that stand out from the overall distribution. These visual cues may hint at underlying relationships or anomalies in the data.
Correlating Categories
Explore the intersections of horizontal and vertical lines, where data cells reside. Compare the values within these cells across different categories to reveal correlations. For instance, if a specific category consistently exhibits higher or lower values than others, it suggests a potential relationship between that category and the variable being represented.
Based on the trends, patterns, and correlations identified, formulate inferences about the data. Consider the context in which the data was collected and the purpose of the visualization. Interpret the results objectively, avoiding biases or assumptions.
Communicate your findings clearly and concisely, highlighting the key insights and any implications they may have. Use the tape diagram as a visual aid to support your narrative, making it easier for readers to understand and engage with the data.
Remember: The analysis phase is not merely about extracting information but about uncovering a deeper understanding of your data. It’s an iterative process, requiring careful observation, interpretation, and contextualization to fully unlock the knowledge hidden within the tape diagram.