Master Stress Analysis With Mohr’s Circle: Unveiling Stress States And Failure Modes
Mohr’s Circle is a graphical representation of stress states at a point, providing insights into stress distribution and failure modes. To draw Mohr’s Circle, determine the center (midpoint of principal stresses) and calculate the radius (shear stress). Plot the principal stresses on the x-axis, draw the circle, and interpret it to determine maximum/minimum stresses and failure modes. Mohr’s Circle has applications in structural engineering, geomechanics, and material science for analyzing stress states and understanding material behavior.
- Definition and purpose of Mohr’s Circle
- Importance of understanding stress state at a given point
Mohr’s Circle, a powerful tool in engineering, unravels the complexities of stress within materials. What is it? Mohr’s Circle is a graphical representation that provides a holistic view of the stress state at a given point within a material. Why is it crucial? Understanding stress states enables engineers to design and analyze structures, ensuring their safety, efficiency, and longevity.
Importance of Understanding Stress State:
Comprehending the stress state at a given point is paramount in understanding how a material will respond to external forces. Stress, defined as the force per unit area acting on a material, can manifest in various forms, including tension, compression, and shear. By analyzing Mohr’s Circle, engineers can determine the principal stresses acting on the material, which are the maximum and minimum normal stresses. These stresses are critical for assessing the strength and behavior of a material.
Navigating Mohr’s Circle: A Step-by-Step Guide:
Drawing Mohr’s Circle involves a systematic approach:
- Locate the Center: The center of the circle is the midpoint of the principal stresses, connecting the maximum and minimum normal stresses on the x-axis.
- Determine the Radius: The radius of the circle represents the shear stress, which acts perpendicular to the principal stresses.
- Plot Principal Stresses: The principal stresses are plotted on the x-axis, providing a visual representation of their magnitude and direction.
- Draw the Circle: Connect the principal stress points with a circle, completing Mohr’s Circle.
Interpretation: Unlocking the Secrets of Stress
Mohr’s Circle reveals the intricate relationship between shear stress and principal stresses. The size of the circle indicates the magnitude of shear stress. The position of the circle relative to the origin provides insights into the material’s failure modes. Based on the circle’s characteristics, engineers can predict whether the material will fail due to tension, compression, or shear.
Understanding Mohr’s Circle: A Step-by-Step Guide to Visualizing Stress States
In the world of engineering, understanding the stress state of a material is crucial for ensuring its integrity and preventing failure. Mohr’s Circle is a powerful tool that allows engineers to visualize and analyze this stress state, providing valuable insights into material behavior and potential failure modes.
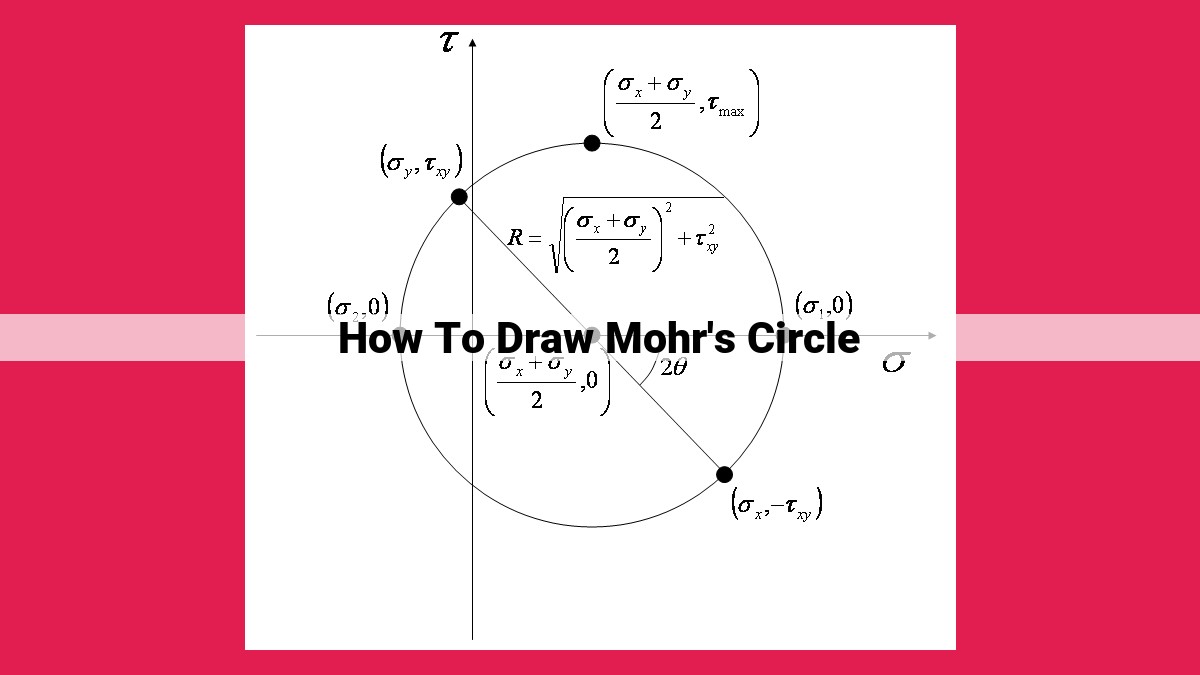
Step 1: Determining the Center of the Circle (Midpoint of Principal Stresses)
The center of Mohr’s Circle is located at the midpoint of the two principal stresses, σ1 and σ2. Principal stresses represent the maximum and minimum normal stresses acting on the material. To determine the center, simply calculate the average of σ1 and σ2:
Center = (σ1 + σ2) / 2
Step 2: Calculating the Radius of the Circle (Shear Stress)
The radius of Mohr’s Circle represents the shear stress acting on the material. Shear stress occurs when forces are applied parallel to the surface of the material, causing it to deform. To calculate the radius, subtract the minimum principal stress (σ2) from the maximum principal stress (σ1) and divide by 2:
Radius = (σ1 - σ2) / 2
Step 3: Plotting Principal Stress Points on the x-Axis
Mohr’s Circle is typically drawn on a x-y plane, with the x-axis representing normal stress and the y-axis representing shear stress. Plot the principal stresses (σ1 and σ2) as points on the x-axis.
Step 4: Drawing the Circle
With the center determined and the radius calculated, you can now draw Mohr’s Circle. Simply use a compass or drawing software to draw a circle with the calculated center and radius. The circle should pass through the principal stress points plotted on the x-axis.
Voila! You have successfully drawn Mohr’s Circle. This graphical representation will provide valuable insights into the stress state of your material, including the relationship between shear stress and principal stresses, the identification of maximum and minimum normal stresses, and the determination of potential failure modes based on the circle’s size and position.
Interpretation of Mohr’s Circle
Mohr’s Circle provides a powerful tool for visualizing and interpreting the stress state at a given point. Let’s delve into its key interpretations:
Relationship between Shear Stress and Principal Stresses
Mohr’s Circle graphically represents the relationship between shear stress and principal stresses. The radius of the circle, which represents the shear stress, is perpendicular to the line connecting the principal stresses. As the circle expands, so does the shear stress. This relationship is crucial for understanding material deformation and failure.
Identification of Maximum and Minimum Normal Stresses
The principal stresses are the maximum and minimum normal stresses acting on the material. They are represented by the leftmost and rightmost points on the x-axis of Mohr’s Circle. The distance from the center of the circle to these points represents the magnitude of the principal stresses.
Determination of Failure Modes Based on Circle Size and Position
The size and position of Mohr’s Circle provide valuable insights into the failure modes of a material. The material’s strength envelope is often represented by a limit curve on the Mohr’s Circle. If the circle intersects the limit curve, the material is predicted to fail. The type of failure depends on the location of the intersection point, indicating either shear failure or tensile or compressive failure.
Example: For a ductile material, when Mohr’s Circle expands beyond the yield strength envelope, yielding occurs. This indicates the onset of plastic deformation. Conversely, for brittle materials, when the circle intersects the Mohr-Coulomb failure envelope, fracture is predicted.
Related Concepts:
- Mohr’s Circle Theory: Historical background and mathematical formulation
- Principal Stresses: Definition, characteristics, and their significance
- Shear Stress: Definition, types, and its role in material behavior
Mohr’s Circle: Understanding the Stress State at a Point
Imagine a tiny point within a stressed material. How do we know the exact force it experiences? Mohr’s Circle, a graphical tool, provides a powerful way to analyze stress states and determine material behavior.
Mohr’s Circle Theory
In the mid-19th century, Christian Otto Mohr proposed his groundbreaking theory. Mohr’s Circle is a circle drawn on a graph, where the axes represent principal stresses, the maximum and minimum normal stresses acting on a point.
Principal Stresses
Principal stresses are like the peaks and valleys of stress at a point. They are perpendicular to each other and indicate the highest and lowest stress levels experienced.
Shear Stress
Mohr’s Circle also reveals the shear stress, the force that causes materials to twist or slide. Shear stress is graphically represented by the radius of the circle.
Plotting Mohr’s Circle
To draw Mohr’s Circle, we first determine the center (midpoint of principal stresses) and calculate the radius (shear stress). Principal stress points are then plotted on the x-axis, and the circle is drawn.
Interpretation of Mohr’s Circle
By analyzing the circle’s size and position, we can determine:
- Relationship between shear stress and principal stresses
- Maximum and minimum normal stresses
- Failure modes based on stress state
Applications of Mohr’s Circle
This versatile tool has wide-ranging applications:
- Structural engineering: Analysis and design of buildings, bridges, and other structures
- Geomechanics: Understanding soil and rock stress states
- Material science: Exploring mechanical properties of materials
Tips and Considerations
Accuracy in data collection and calculation is crucial for reliable results. Properly interpreting Mohr’s Circle in various stress scenarios is essential. Limitations and assumptions associated with the theory should be considered.
Understanding Mohr’s Circle is a valuable skill for engineers and scientists alike. By providing a clear visualization of stress states, it helps us predict material behavior and optimize designs for a wide range of applications.
Mohr’s Circle: Decoding the Stress Landscape
Imagine an engineer tasked with designing a colossal bridge that must withstand the unrelenting forces of nature. Or a scientist delving into the hidden depths of the Earth, seeking to unravel the intricate stress patterns within soil and rock. In these demanding scenarios, Mohr’s Circle emerges as an indispensable tool, providing a comprehensive understanding of the stress state at any point in a material.
Unveiling the Hidden Stress Dynamics
Mohr’s Circle is a graphical representation that reveals the interplay between normal and shear stresses acting on a material. By constructing this circle, engineers and scientists gain invaluable insights into the material’s mechanical behavior and potential failure modes.
Step-by-Step Guide to Mohr’s Circle
To harness the power of Mohr’s Circle, follow these meticulous steps:
-
Determine the Circle’s Center: Locate the midpoint between the two principal stresses, the maximum and minimum normal stresses in the material. This point represents the average stress.
-
Calculate the Circle’s Radius: Measure the shear stress, which acts perpendicular to the principal stresses. This value corresponds to the radius of the circle.
-
Plot the Principal Stress Points: Mark the two principal stress points on the horizontal axis of the circle.
-
Draw the Circle: Connect the principal stress points using a circle with the calculated radius.
Interpreting the Mohr’s Circle’s Secrets
The Mohr’s Circle unveils a wealth of information:
-
Shear Stress Relationship: The distance from the circle’s center to a point on the circle indicates the shear stress at that point.
-
Maximum and Minimum Normal Stresses: The highest and lowest points on the circle correspond to the maximum and minimum normal stresses, respectively.
-
Failure Modes: The size and position of the circle provide clues about potential failure modes, such as tension, compression, or shear failure.
Applications of Mohr’s Circle: Empowering Engineers and Scientists
Mohr’s Circle finds widespread use in various fields:
-
Structural Engineering: Designing bridges, buildings, and other structures that can withstand complex stress distributions.
-
Geomechanics: Analyzing soil and rock stress states to understand geological formations and potential hazards.
-
Material Science: Studying the mechanical properties of materials, such as their strength, ductility, and yield strength, to optimize their performance.
By embracing Mohr’s Circle, engineers and scientists unravel the hidden stress dynamics within materials, enabling them to design and analyze structures with confidence, explore the Earth’s depths with precision, and push the boundaries of material science innovation.
Tips and Considerations for Mohr’s Circle Analysis
Accuracy in Data Collection and Calculations
The accuracy of Mohr’s Circle depends heavily on the precision of the input data. Careful consideration must be given to measuring stress components and ensuring proper conversion of units. Errors in measurements or calculations can lead to incorrect circle representation and misleading interpretations.
Interpretation in Various Stress Scenarios
Mohr’s Circle provides insights into stress states under different loading conditions. Understanding the relationship between principal stresses and shear stress is crucial. The size and position of the circle reveal information about maximum and minimum normal stresses and potential failure modes.
Limitations and Assumptions
While Mohr’s Circle is a valuable tool, it has certain limitations and assumptions:
- It assumes linear elastic behavior of the material.
- It neglects the effects of other stress components, such as out-of-plane shear stresses.
- It assumes a two-dimensional stress state.
By considering these limitations, engineers can apply Mohr’s Circle appropriately and avoid erroneous interpretations.