Mastering Perpendicular Bisector Construction: A Comprehensive Guide
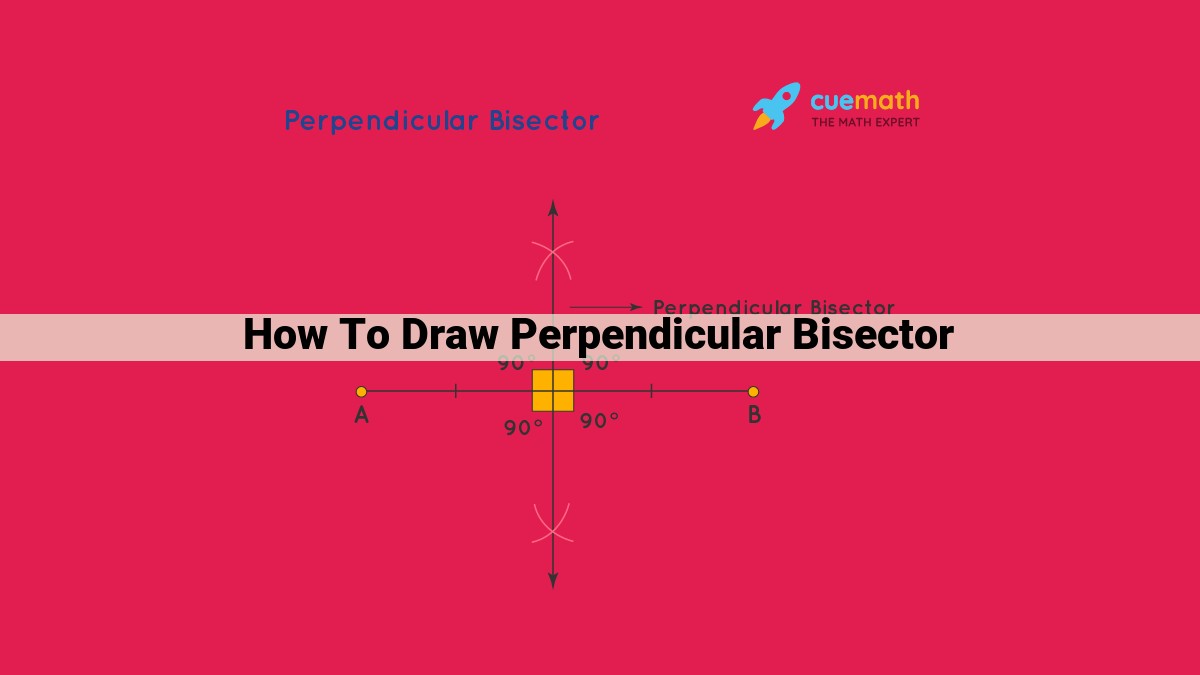
To draw a perpendicular bisector for a line segment, find its midpoint by measuring its length and dividing by two. Mark the midpoint and use a compass to draw a circle with the midpoint as the center and a radius equal to half the line segment’s length. Draw two perpendicular lines from the circle’s points equidistant from the ends of the line segment. The line passing through the midpoint and perpendicular to the line segment is the perpendicular bisector.
Drawing Perpendicular Bisectors: A Step-by-Step Guide
In the realm of geometry, perpendicular bisectors play a crucial role in dividing line segments and angles with precision. These versatile tools are essential for constructing accurate geometric figures, solving geometry problems, and understanding geometric relationships.
Importance of Perpendicular Bisectors
Imagine a world without perpendicular bisectors. Line segments would be divided unevenly, angles would be imprecise, and the intricate beauty of geometric shapes would be lost. Perpendicular bisectors provide the backbone for creating the building blocks of geometry, ensuring exactness and order.
Applications in Geometry
The applications of perpendicular bisectors extend beyond textbooks and into real-world scenarios. In architecture, they are used to design symmetrical buildings, while in engineering, they help determine the center of mass of objects. They also play a pivotal role in manufacturing, where precision and accuracy are paramount.
How to Draw Perpendicular Bisectors: A Step-by-Step Guide for Beginners
Perpendicular bisectors are essential tools in geometry, used to divide line segments and angles into two equal parts. Understanding how to draw them is crucial for solving various geometry problems and exploring mathematical concepts.
Tools You’ll Need:
To start, you’ll need the following geometry tools:
- Compass: This tool will help you draw circles and arcs.
- Ruler: For measuring line segments and marking distances.
- Protractor: To measure and construct angles accurately.
Step-by-Step Instructions for a Line Segment:
- Find the Midpoint: Use the ruler to measure the length of the line segment and divide it by two. Mark the midpoint with a small tick mark.
- Draw a Circle: Set the compass to a radius equal to half the length of the line segment and place its tip at the midpoint. Draw a circle that intersects the line segment at two points.
- Construct Perpendicular Lines: Use the compass to draw two arcs with the same radius from the two points where the circle intersects the line segment. Connect the points of intersection of these arcs with the midpoint to create the perpendicular bisector.
Related Concepts: Midpoint, Circle, Radius
- The midpoint of a line segment is the center of its perpendicular bisector.
- The circle drawn in step 2 is inscribed in a rectangle whose sides are tangent to the circle and diameter is the perpendicular bisector.
Step-by-Step Instructions for an Angle:
- Draw a Ray: From the vertex of the angle, draw a ray that bisects it.
- Measure Equal Arcs: Use the protractor to measure equal arcs (half the angle’s measure) on both sides of the ray and mark them with arcs.
- Connect the Marks: Connect the marks on the arcs to the vertex to create two equal segments.
- Draw the Perpendicular Line: Use the ruler to draw a line perpendicular to the ray that passes through the vertex. This line will be the perpendicular bisector of the angle.
Related Concepts: Angle Bisector, Degree, Quadrant
- The perpendicular bisector of an angle is also its angle bisector.
- The degree measurement and the length of the arcs play a crucial role in constructing the angle bisector accurately.
Drawing perpendicular bisectors is a fundamental skill in geometry that unlocks a wide range of problem-solving abilities. By following these step-by-step instructions and understanding the related concepts, you’ll be equipped to confidently navigate any geometry problem that requires dividing line segments or angles precisely.
Step-by-Step Instructions for a Line Segment:
- Finding the midpoint
- Drawing a circle through the endpoints
- Constructing perpendicular lines from the circle’s equidistant points
Drawing Perpendicular Bisectors: A Step-by-Step Guide to Dividing Lines and Angles
In the realm of geometry, the enigmatic line called the perpendicular bisector holds a special place. It plays a pivotal role in dividing both line segments and angles with remarkable precision. Understanding the concept and technique of drawing perpendicular bisectors is a fundamental skill for any geometry enthusiast.
Step-by-Step Guide to Drawing a Perpendicular Bisector of a Line Segment
Let’s delve into the magical world of perpendicular bisectors by exploring the steps to draw one for a line segment:
-
Finding the Midpoint:
The first step is to pinpoint the midpoint of the line segment, which serves as the heart of our perpendicular bisector. To do this, grab a compass and place its sharp point at one endpoint. Extend the compass to the other endpoint and draw an arc. Repeat this step from the other endpoint, creating an intersection point that marks the coveted midpoint. -
Drawing a Circle Through the Endpoints:
With the midpoint determined, it’s time to invoke the power of circles. Place the compass point at the midpoint and extend it beyond the line segment. Draw a circle that passes through both endpoints of the line segment. This circle is our magical orb that holds the key to constructing the perpendicular bisector. -
Constructing Perpendicular Lines:
Now, we embark on the crucial part: drawing perpendicular lines that will ultimately yield our perpendicular bisector. Identify two points on the circle that are equidistant from the midpoint. With the compass still at the midpoint, extend it to one of the identified points and draw an arc. Repeat this step from the other identified point, creating two intersecting arcs. The intersection point of these arcs lies on the perpendicular bisector. Draw a line from the midpoint to this intersection point, and behold, you have constructed the perpendicular bisector of the line segment.
Drawing Perpendicular Bisectors: A Journey to Precision
In the realm of geometry, the art of drawing perpendicular bisectors reigns supreme. These lines, precisely bisecting line segments and angles, are essential tools for a wide range of applications. From effortlessly dividing shapes to dissecting angles, the mastery of this technique unlocks a world of geometrical precision.
Midpoint: The Guiding Star
The midpoint of a line segment holds the secret to finding its perpendicular bisector. It serves as the heart of the circle that passes through both endpoints of the segment. The radius of this circle, connecting the midpoint to each endpoint, acts as the guiding force in constructing the perpendicular bisector.
Circle and Perpendicular Bisector: A Symbiotic Duo
Imagine a rectangle, its vertices connected by perpendicular bisectors. These lines form a circle inscribed within the rectangle. The diameter of this circle, coinciding with the perpendicular bisector, reveals a fascinating connection. The midpoint of the line segment becomes the center of this circle, demonstrating the intimate relationship between the two concepts.
Applications: A Tapestry of Geometrical Wonders
The ability to draw perpendicular bisectors opens doors to a myriad of geometrical wonders. From dividing line segments into equal parts to finding the bisectors of angles, these lines play a pivotal role in unraveling complex shapes and angles.
Mastering the art of drawing perpendicular bisectors empowers us with a powerful tool for geometrical exploration. By unraveling its secrets, we gain the ability to dissect shapes and angles with precision, unlock hidden relationships, and embark on a journey of geometrical discovery. Let us embrace this technique and venture into the fascinating world of geometry, where the power of perpendicular bisectors awaits our exploration.
Mastering Perpendicular Bisectors: A Comprehensive Guide
In the realm of geometry, perpendicular bisectors play a crucial role in dividing line segments and angles precisely. Understanding how to draw them accurately can unlock a wealth of applications in various fields.
Tools for the Task
Before embarking on our journey, let’s gather the necessary tools:
- Compass: A compass allows us to draw circles, which are essential for constructing perpendicular bisectors.
- Ruler: A ruler helps us measure lengths and locate midpoints.
- Protractor: A protractor is indispensable for measuring and dividing angles.
Drawing Perpendicular Bisectors for Line Segments
Step 1: Find the Midpoint
To bisect a line segment, we first need to find its midpoint. Using a ruler, measure the length of the segment and divide it by 2. Mark the midpoint with a small dot or tick mark.
Step 2: Draw a Circle
Use the compass to draw a circle with its center at the midpoint and its radius equal to half the length of the line segment. This circle will intersect the segment at its endpoints.
Step 3: Construct Perpendicular Lines
Identify two points on the circle that are equidistant from the midpoint. These points will be the centers of the perpendicular bisectors. Use the compass to draw perpendicular lines from these points to the line segment. The intersection of these lines will be the perpendicular bisector of the segment.
Dividing Angles with Perpendicular Bisectors
Step 1: Draw a Ray
To bisect an angle, start by drawing a ray from its vertex. This ray will serve as the bisector.
Step 2: Measure and Mark Arcs
Use a protractor to measure half the angle and mark two arcs of this measure on the ray. The distance between these arcs should be equal to the radius of the circle we’ll draw later.
Step 3: Connect the Marks
Connect the marked arcs to the vertex of the angle, forming two line segments.
Step 4: Draw a Perpendicular Line
Finally, draw a perpendicular line from the vertex to the ray, intersecting the line segments at their midpoints. This line will be the perpendicular bisector of the angle.
Related Concepts
- Midpoint: The midpoint of a line segment is the point that divides it into two equal parts and lies on its perpendicular bisector.
- Circle Circumference: The length of the circle’s boundary is determined by its radius and can be calculated using the formula 2πr.
- Angle Bisector: A line that divides an angle into two equal parts is called an angle bisector, and its intersection with the angle is the point of division.
Mastering the art of drawing perpendicular bisectors is a valuable skill that finds applications in various disciplines, including geometry, architecture, and design. By understanding the steps and related concepts outlined in this guide, you’ll be well-equipped to tackle any perpendicular bisector challenge that comes your way. Remember, with practice and precision, you’ll be dividing line segments and angles like a pro!
Drawing the Perpendicular Bisectors: A Path to Geometric Precision
In the realm of geometry, perpendicular bisectors play a pivotal role in precisely dividing segments and angles. Their applications extend far beyond textbooks, impacting various fields of science, engineering, and design.
The Tools of the Trade
To embark on this geometric adventure, gather these essential tools:
- Compass: A trusty companion for drawing precise circles
- Ruler: A guide for measuring distances and constructing straight lines
- Protractor: A device for measuring and creating angles
Step-by-Step Guide for a Line Segment
-
Find the Midpoint: Determine the exact middle point of your segment, using a ruler or by folding a piece of paper along the segment and marking the crease.
-
Draw a Circle: Center your compass at the midpoint and extend it to a radius beyond both endpoints. Draw a circle that passes through the endpoints.
-
Perpendicular Intersections: Locate two points on the circle that are equidistant from both endpoints. Draw two perpendicular lines through these points, which will intersect at the midpoint, forming the perpendicular bisector.
Step-by-Step Guide for an Angle
-
Ray from Vertex: Draw a ray extending from the angle’s vertex.
-
Equal Arcs: Measure and mark equal arcs, each representing half the angle.
-
Connect to Vertex: Connect the marks to the vertex.
-
Perpendicular Ray: Draw a perpendicular line from the vertex to the ray, which will bisect the angle.
Beyond the Basics: Related Concepts
Angle Bisector and Perpendicular Bisector: Surprisingly, the perpendicular bisector of a segment is also the bisector of the angle formed by the segment’s endpoints.
Degree Measurement and Arc Length: In angle bisector construction, the degree measure and arc length on the ray are essential for accuracy. A protractor helps measure angles, while a compass ensures equal arc lengths.
Mastering the art of drawing perpendicular bisectors empowers you to tackle complex geometric problems with confidence. By comprehending the steps and exploring the related concepts, you unlock a versatile tool applicable not only in geometry but also in various other disciplines.
