Expert Guide: Master The Art Of Preparing Wet Mount Microscope Slides
To prepare a wet mount microscope slide, gather necessary materials (microscope, slide, coverslip, mounting medium). Collect and prepare the specimen, then mount it on the slide using the mounting medium. Place the coverslip over the specimen, ensuring no bubbles or distortion. Remove excess water with absorbent paper. Position the slide on the microscope stage and adjust focus and magnification. Employ tips like proper lighting, focus maintenance, and specimen stabilization for optimal observation.
Preparing a Wet Mount Microscope Slide: A Comprehensive Guide
- Introduce the concept of wet mount microscope slides and their importance in microscopy.
Preparing a Wet Mount Microscope Slide: Your Ultimate Guide to Microscopy Success
In the realm of microscopy, wet mount microscope slides hold a special place, allowing scientists and educators to observe biological specimens in their natural state. If you’re eager to embark on your microscopy journey, crafting a perfect wet mount slide is essential. Here’s a comprehensive guide to help you ace it:
Materials You’ll Need:
- Microscope
- Microscope slide
- Coverslip
- Mounting medium (e.g., water, glycerol)
Specimen Preparation:
The key to a successful wet mount slide lies in preparing your specimen. Gently collect it from its source (e.g., a pond or a leaf) and ensure it’s thin enough to allow light to pass through it. For delicate specimens, use a scalpel or fine scissors to cut thin sections.
Mounting the Specimen:
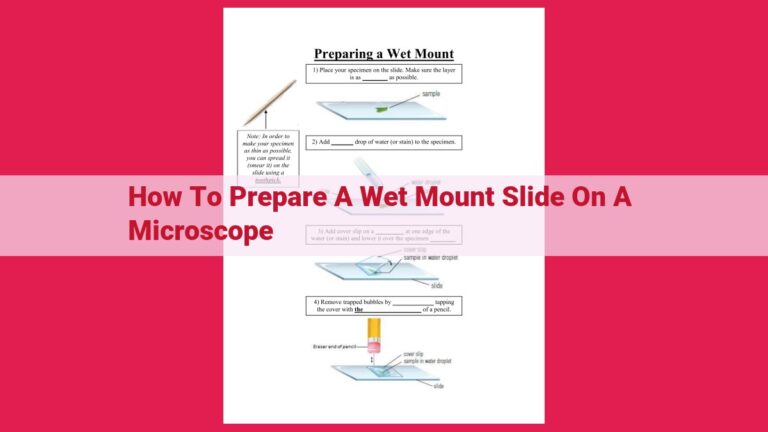
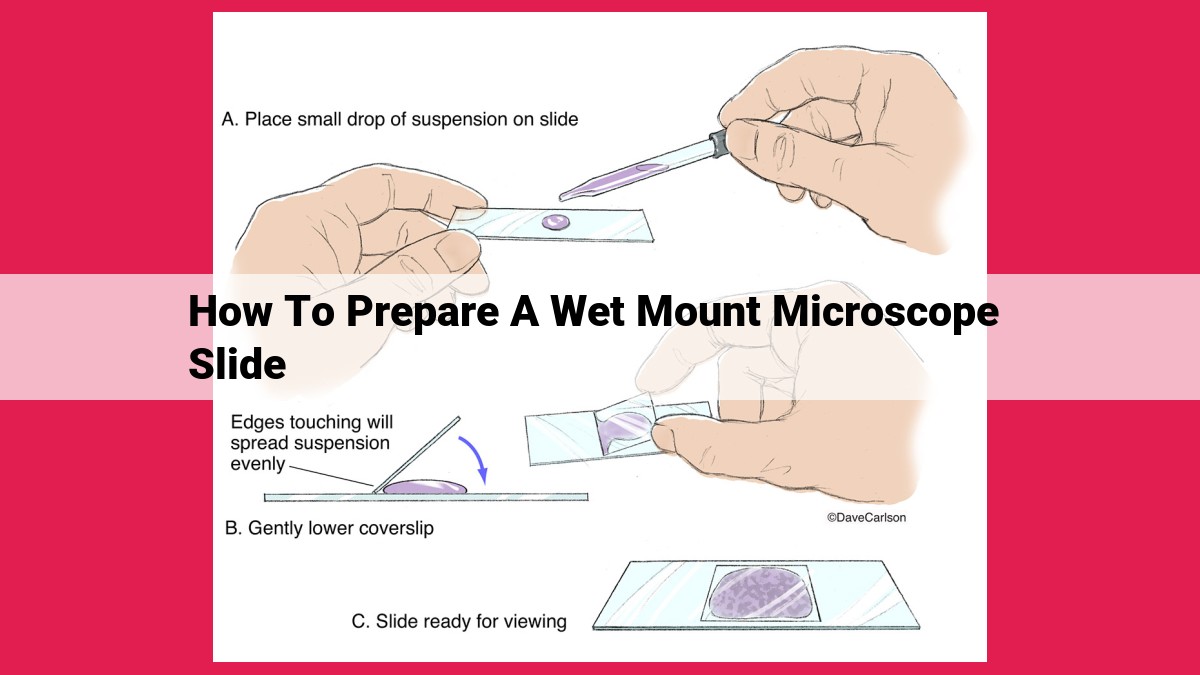
Now it’s time to mount your specimen on the microscope slide. Place a small drop of mounting medium in the center of the slide and carefully transfer your specimen onto it. Use a fine needle or tweezers to manipulate it and arrange it in the desired position.
Placing the Coverslip:
The coverslip protects the specimen and prevents it from drying out. Gently lower it onto the slide at an angle to avoid trapping air bubbles. Use the corner of a paper towel to gently press down on the coverslip, removing any excess mounting medium.
Removing Excess Water:
If you used water as the mounting medium, you’ll need to remove excess water. Place absorbent paper on the edges of the coverslip and gently apply pressure to draw out the water. Avoid touching the specimen with the paper.
Examining the Slide:
Place the slide on the microscope stage and secure it. Adjust the focus and magnification settings until you can clearly see the specimen. Play with the lighting to enhance the visibility of different structures.
Tips for Optimal Observation:
- Use proper lighting to illuminate the specimen without overexposing it.
- Maintain focus by gently adjusting the focus knob.
- Avoid specimen movement by securing the slide and using a fine adjustment knob for focus.
By following these steps, you’ll be able to create pristine wet mount microscope slides that will reveal the fascinating world of microscopy. Remember to practice and experiment with different specimens to hone your skills and embark on an awe-inspiring journey of scientific discovery!
Materials Required for Wet Mount Microscope Slide Preparation
Embarking on the world of microscopy begins with gathering the essential tools that will unveil the hidden wonders of the microscopic realm. The foundation of this exploration lies in preparing a wet mount slide, which allows you to observe living specimens in a water-based environment.
To craft these illuminating slides, you’ll need:
-
Microscope: The gateway to the microscopic world, revealing the secrets of specimens magnified many times their original size.
-
Microscope Slide: A translucent glass or plastic platform that serves as the canvas for your microscopic masterpiece.
-
Coverslip: A thin, transparent layer that plays a crucial role in flattening the specimen, reducing distortion, and providing a clear viewing experience.
-
Mounting Medium: The liquid that encases the specimen, providing a supportive and transparent environment for observation.
Specimen Preparation for Microscopy: A Guide to Effective Observation
Preparing specimens for microscopy is a crucial step in obtaining clear and informative observations. Here’s a comprehensive guide to assist you with this process:
Specimen Collection
- Fresh specimens: Collect specimens directly from their natural environment or the source. Ensure minimal handling to avoid damage.
- Preserved specimens: Obtain specimens that have been preserved using techniques such as fixation and embedding.
Specimen Preparation Techniques
a. Cells and Tissues:
- Staining: Apply dyes to enhance the visibility of specific cellular components.
- Sectioning: Create thin slices of tissue using a microtome for detailed analysis.
b. Microorganisms:
- Wet mount: Place a drop of fluid containing the microorganisms on a slide and cover with a coverslip.
- Smears: Spread a thin layer of microorganisms on a slide to reveal their morphology.
c. Plant and Animal Material:
- Freehand sectioning: Use a razor blade to make thin sections of plant or animal tissue.
- Embedded sectioning: Embed the specimen in a resin or paraffin wax and use a microtome to create thin sections.
Specific Tips for Different Specimens
- Soft specimens: Handle with care, avoid crushing or tearing.
- Hard specimens: May require specialized preparation techniques, such as grinding or polishing.
- Live specimens: Observe under special conditions to preserve their activity.
- Microscopic organisms: Use diluted solutions to avoid osmotic damage.
Remember, proper specimen preparation is essential for successful microscopy. By following these guidelines, you can ensure the integrity and visibility of your specimens, leading to accurate and informative observations.
Mounting the Specimen: A Precision Technique for Microscope Exploration
In the intricate world of microscopy, where the unseen becomes visible, preparing a wet mount microscope slide is an essential skill. Among the various steps involved, mounting the specimen is a critical one, requiring precision and care.
To begin, gently place a small drop of mounting medium onto the center of the clean microscope slide. The mounting medium is a transparent substance, typically water or glycerol, that helps hold the specimen in place and minimizes distortion.
Next, carefully transfer the specimen from the preparation dish onto the mounting medium. Use fine-tipped forceps or a pipette to handle the specimen gently, avoiding any damage.
Once the specimen is on the slide, slowly lower the coverslip onto the mounting medium. Start from one edge and gradually lower the coverslip at an angle to prevent trapping air bubbles.
Avoid pressing down too hard on the coverslip, as this could crush the specimen or create distortion. Once the coverslip is in place, use a small piece of absorbent paper to remove any excess mounting medium that has seeped out from the edges.
This step is crucial to prevent blurring and enhance the clarity of the specimen. It also reduces the risk of the coverslip shifting during observation.
The mounted specimen is now ready for examination under the microscope. By following these steps carefully, you can ensure that your specimen is well-prepared and ready to reveal its hidden details.
The Art of Placing the Coverslip: A Crucial Step in Wet Mount Microscopy
In the realm of microscopy, preparing a wet mount slide is an essential technique that allows us to observe specimens under the lens. One of the most crucial steps in this process is placing the coverslip. This seemingly simple task can significantly impact the quality of your observations, so it’s imperative to master the proper technique.
The coverslip serves several important functions. It protects the specimen from drying out and prevents the specimen from moving around unnecessarily. It also reduces spherical aberration, which can distort the image.
To place the coverslip correctly, follow these steps:
- Prepare your slide and specimen as usual.
- Hold the coverslip at a slight angle, with one edge touching the edge of the slide.
- Gently lower the coverslip onto the specimen, starting from one side and moving towards the other.
- If bubbles form, carefully use the tip of a needle or a pair of forceps to remove them.
- Ensure that the coverslip is flat and not tilted or uneven.
Avoiding Bubbles
Bubbles are the most common problem encountered when placing a coverslip. They can obscure the specimen and make observation difficult. To avoid bubbles, follow these tips:
- Use a clean, lint-free coverslip.
- Gently lower the coverslip onto the specimen, and avoid pressing down on it.
- If bubbles do form, gently push them out with the tip of a needle or a pair of forceps.
- Use a mounting medium to fill in the space between the specimen and the coverslip. This will help to prevent bubbles from forming.
Importance of Proper Placement
Properly placing the coverslip is crucial for several reasons:
- *Prevents specimen damage: The coverslip protects the specimen from drying out and physical damage.
- *Reduces image distortion: By reducing spherical aberration, the coverslip ensures that the image you observe is as clear and accurate as possible.
- *Enhances contrast: The use of a mounting medium between the specimen and the coverslip improves contrast, making details more visible.
By following these steps and mastering the art of placing the coverslip, you will significantly enhance your wet mount microscopy experience. Remember, it’s all about creating a stable and optimal environment for your observations, allowing you to unlock the wonders of the microscopic world with clarity and precision.
Removing Excess Water: A Crucial Step for Clear Observation
When preparing a wet mount microscope slide, removing excess water is a vital step that enhances the clarity and accuracy of your observations. Water can cause distortion, making it difficult to focus on and identify specimen details.
Why Remove Excess Water?
Excess water can lead to several problems:
- Distortion: Water can create a lens effect, making the specimen appear distorted or out of focus.
- Blurred images: Water can scatter light, reducing image sharpness and clarity.
- Movement: Excess water can cause the specimen to move around, making it challenging to keep in focus.
Tips for Removing Excess Water
To effectively remove excess water, follow these simple tips:
- Use absorbent paper: Gently place a piece of absorbent paper on the edge of the coverslip. The paper will draw away any excess water.
- Avoid touching the specimen: Be cautious not to touch the area where the specimen is mounted, as this could disrupt or damage it.
- Use light strokes: When using absorbent paper, apply gentle strokes to prevent disturbing the specimen.
- Inspect regularly: Check the slide frequently and remove any remaining water droplets as needed.
By removing excess water, you create an optimal environment for microscopy, allowing you to obtain clear and undistorted images of your specimen.
Examining the Prepared Microscope Slide
Now that your meticulously crafted wet mount slide is ready, it’s time to embark on the fascinating journey of microscopic exploration. Here’s how to navigate the process of slide examination like a seasoned pro:
Step 1: Mount the Slide with Precision
Carefully place your prepared slide onto the microscope stage, aligning it with the stage clips. Securely fasten it to prevent any movement during observation.
Step 2: Adjust Focus and Magnification
Begin by using the coarsest focus knob to bring your specimen into approximate focus. Then, switch to the finer focus knob for precise adjustments. Gradually increase the magnification using the objective lenses, starting with the lowest power (usually 4x or 10x) and working your way up to higher magnifications.
Step 3: Seek Optimal Lighting
Proper illumination is crucial for clear observation. Experiment with the microscope’s light intensity and condenser position to optimize specimen illumination. Avoid over-illumination, as it can obscure details.
Step 4: Fine-tune for Clarity
Once you’ve achieved focus, slightly adjust the focus knob back and forth to obtain the sharpest possible image. Use the diaphragm to control contrast, enhancing the visibility of details.
Step 5: Immerse Yourself in Discovery
Spend time scrutinizing the specimen, taking note of its shape, size, texture, and any other distinctive features. Pay attention to the movement of living organisms or any dynamic processes that may be occurring.
Tips for Optimal Observation
- Provide additional tips to enhance the microscopy experience, such as using proper lighting, maintaining focus, and avoiding specimen movement.
Tips for Enriching Your Microscopy Experience: Unraveling the Secrets of Optimal Observation
When embarking on your microscopic voyage, meticulous preparation is paramount. But once your specimen is gracefully positioned on its microscopic throne, the art of keen observation comes into play. To elevate your microscopy experience to celestial heights, let’s unveil a treasury of practical tips that will ignite your exploration.
Unveiling the Secrets of Illumination
Proper lighting is the gateway to discerning the intricate details hidden within your specimen. Begin by adjusting the intensity and angle of your light source. Use oblique lighting to cast captivating shadows that accentuate the topography of your microscopic realm. By finetuning the illumination, you’ll unveil a world of hidden wonders.
Maintaining Focus: A Journey into Sharpness
Maintaining unwavering focus is crucial for capturing the essence of your microscopic masterpiece. Utilize the coarse and fine focus knobs to delineate every contour and crevice with precision. Remember, a steady hand and a keen eye will reward you with breathtaking clarity.
Conquering Specimen Movement: The Dance of Stillness
To prevent your specimen from becoming a restless marionette, employing techniques to immobilize it is essential. A gentle touch with a glass rod or the judicious application of a mounting medium will ensure your specimen remains poised for scrutiny. By mastering the art of specimen control, you’ll witness the mesmerizing dance of microscopic life unfolding before your very eyes.
Additional Pointers for Microscopic Enlightenment
-
Embrace the grandeur of a clean microscope. A smudge-free lens and pristine slide will unveil a world unmarred by distractions.
-
Patience is a virtue in the microscopic realm. Allow your eyes to adjust to the intricacies of the specimen. Linger on each detail, savoring the discoveries that await you.
-
Don’t shy away from experimenting with different magnifications. Each perspective unveils a unique tapestry of wonders, enriching your understanding of the microscopic world.
By embracing these tips, you’ll ascend to the pinnacle of microscopic mastery, unlocking a realm of hidden marvels and endless fascination. So, let your curiosity guide you, and may your microscopy journeys be filled with the joy of discovery.
