Create Agarose Gels For Efficient Electrophoresis: A Comprehensive Guide
To make agarose gel, prepare an agarose solution by dissolving agarose powder in buffer. Heat the solution until it boils and becomes clear. Pour the hot agarose solution into a gel casting tray and insert a gel comb to create wells. Allow the gel to cool and solidify. Carefully remove the gel comb and you have an agarose gel ready for electrophoresis, a technique that separates molecules based on size and charge.
Unlocking the Power of Agarose Gels: A Comprehensive Guide for Molecular Biology
In the realm of molecular biology, agarose gels hold a crucial place as a versatile tool for investigating the building blocks of life. These gels, crafted from the natural polymer agarose, provide a precise and efficient means of separating and analyzing nucleic acids (DNA and RNA) and proteins. Their applications extend far and wide, offering insights into genetic diversity, disease diagnosis, and forensic investigations.
Understanding the Building Block: Agarose
Agarose, a polysaccharide derived from red algae, possesses unique properties that make it ideal for gel preparation. Its linear structure and ability to form a gel when heated and cooled create a porous matrix through which molecules can migrate. This matrix acts as a molecular sieve, allowing smaller molecules to move more easily than larger ones.
The Role of Buffers: Maintaining Equilibrium
Buffers, solutions that resist changes in pH, play a vital role in the performance of agarose gels. They establish and maintain the appropriate pH, ionic strength, and electrolyte balance necessary for electrophoresis. Buffers influence the migration of molecules, as charged molecules can interact with ions in the buffer, affecting their movement through the gel.
Electrophoresis: The Separation Mechanism
Electrophoresis is the process by which molecules are separated based on their size and charge. In an agarose gel, an electrical field is applied, causing negatively charged molecules to migrate towards the positive electrode and positively charged molecules towards the negative electrode. Smaller molecules navigate the gel pores more effortlessly, resulting in a faster migration rate compared to larger molecules.
Understanding the Building Block: Agarose
Agarose: A Seaweed-Derived Wonder
In the realm of molecular biology, understanding the intricacies of agarose gels is pivotal. But before we dive into their preparation, it’s essential to explore the very essence of agarose—the backbone of these indispensable tools.
Agarose, an extraordinary polysaccharide, finds its origins in the depths of the ocean, extracted from the cell walls of red seaweed. This natural polymer boasts unique gelling properties that make it the perfect candidate for crafting agarose gels.
The Secret to Gel Formation: A Molecular Dance
What sets agarose apart is its ability to form reversible gels. When heated, agarose molecules unravel and become highly mobile. As the solution cools, these molecules entangle and cross-link, creating a three-dimensional network. This network acts like a molecular sieve, entraping molecules based on their size.
Agarose’s Gel Strength: A Balancing Act
The strength of an agarose gel, measured in percentage (w/v), is critical. Lower percentages (0.5-1.5%) allow larger molecules to pass through easily, while higher percentages (2-3%) create tighter pores, effectively trapping smaller molecules. This versatility makes agarose gels suitable for a wide range of separation applications in molecular biology.
The Role of Buffers: Maintaining the Delicate Balance for Electrophoresis
When it comes to agarose gel electrophoresis, the unsung heroes behind the successful separation of molecules are buffers. These chemical solutions play a pivotal role in establishing the optimal conditions for electrophoresis, ensuring accurate and reliable results.
Buffers: The pH Regulators and Electrolyte Balancers
Buffers consist of weak acids and their conjugate bases, or vice versa. They have the remarkable ability to resist pH changes, maintaining a stable environment for electrophoresis. This is crucial because extreme pH can alter the charge and structure of molecules, affecting their migration through the gel.
Another critical function of buffers is to provide the necessary electrolyte balance. Electrolytes are charged ions that carry electrical current. Buffers contain a specific concentration of ions that create an electrical field within the gel. This field drives the movement of charged molecules during electrophoresis.
Fine-tuning Buffers for Optimal Separation
The choice of buffer depends on the specific application. Different buffers have different pH and ionic strength, which influence the migration rate of molecules through the gel. For example, Tris-acetate-EDTA (TAE) buffer is commonly used for DNA electrophoresis, while Tris-borate-EDTA (TBE) buffer is preferred for RNA electrophoresis.
By carefully selecting and optimizing the buffer system, researchers can control the separation efficiency of agarose gels. Buffers ensure that molecules migrate at the appropriate rate, enabling clear and distinct separation based on their size and charge.
Buffers: The Unsung Heroes of Electrophoresis
Without buffers, agarose gel electrophoresis would be a chaotic mess. They provide the stable pH, electrolyte balance, and electrical field that allow molecules to be precisely separated. Buffers are the unsung heroes of electrophoresis, ensuring that researchers can confidently analyze and interpret their molecular data.
Electrophoresis: The Separation Mechanism
- Define electrophoresis and explain how it separates molecules based on size and charge.
- Discuss the principle of molecule migration through the agarose gel.
Electrophoresis: The Separation Mechanism
Electrophoresis, a cornerstone technique in molecular biology, masterfully separates molecules based on size and charge. In this captivating world of molecules, electrophoresis plays the role of a skilled conductor, guiding molecules of different sizes and charges through an agarose gel, much like a maze.
At the heart of electrophoresis lies the principle of molecule migration. As an electric current flows through the gel, it generates an electrical field. This field exerts a force on the charged molecules, causing them to migrate through the gel. Negatively charged molecules, for example, migrate towards the positive electrode, while positively charged molecules move towards the negative electrode.
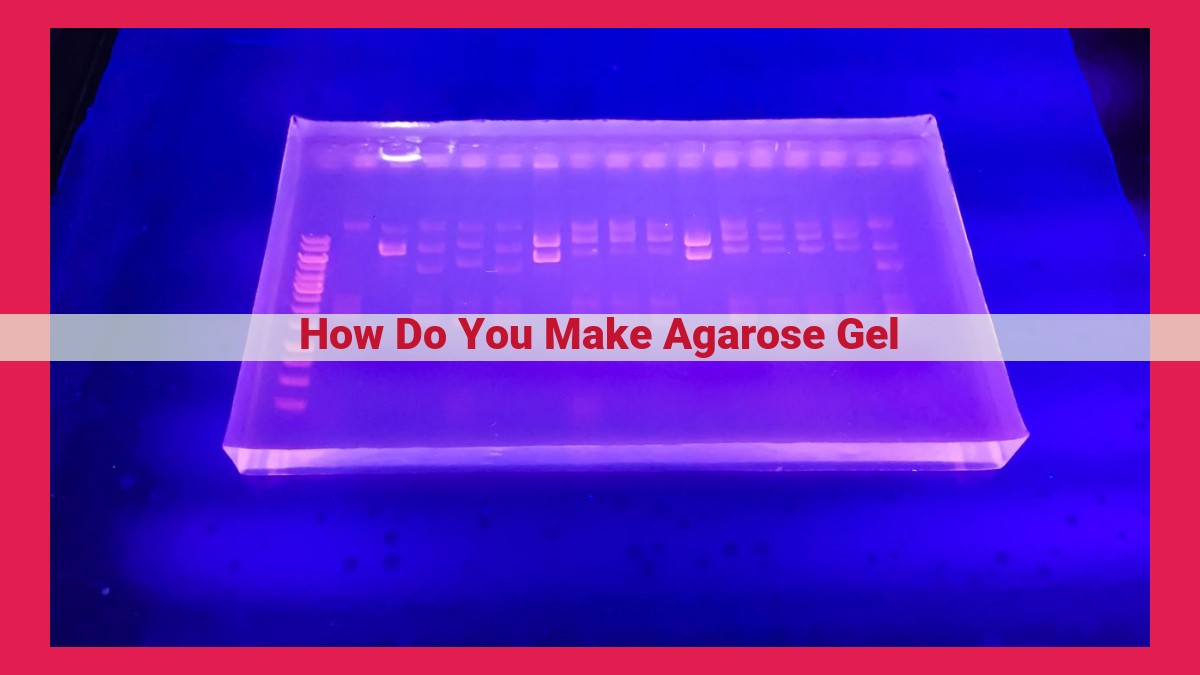
The size of the molecules also plays a crucial role. Larger molecules, with their bulkier structures, navigate the gel’s pores more slowly than their smaller counterparts. This differential migration rate creates distinct bands, with smaller molecules traveling farther than larger ones. These bands, visible under ultraviolet light, reveal the size and charge of the molecules present in the sample.
Electrophoresis, with its ability to resolve molecules based on size and charge, has become an indispensable tool in molecular biology. It allows researchers to identify specific molecules, separate DNA fragments for sequencing, and analyze protein samples. It’s a technique that continues to illuminate the intricacies of the molecular world, unlocking secrets and driving scientific discoveries.
Casting the Agarose Gel: A Step-by-Step Guide to Precision
Preparing an agarose gel is a crucial step in molecular biology techniques, allowing scientists to separate and analyze DNA, RNA, and proteins. Understanding the process of gel casting empowers researchers to create high-quality gels that deliver accurate and reliable results.
Components of a Gel Casting Tray and Gel Comb
Gel casting tray: A rectangular mold with raised edges that holds the agarose solution during gel formation.
Gel comb: A tool with equally spaced teeth that form the wells where samples are loaded. The number of teeth determines the number of wells in the gel.
Step-by-Step Gel Casting Instructions
-
Prepare the agarose solution: Weigh the required amount of agarose powder and dissolve it in a suitable buffer. The concentration of agarose determines the pore size of the gel, with higher concentrations creating tighter pores.
-
Heat the agarose solution: Heat the agarose solution in a microwave or on a hot plate until it boils and becomes clear. Avoid overheating, as this can damage the agarose.
-
Add stain (optional): If desired, add a DNA stain such as ethidium bromide to the cooled agarose solution. This will allow DNA bands to be visualized under UV light.
-
Assemble the gel casting tray: Place the gel comb in the casting tray, ensuring that the teeth are facing inwards.
-
Pour the agarose solution: Carefully pour the molten agarose solution into the casting tray, filling it to the top. Avoid introducing bubbles, as they can disrupt the gel’s homogeneity.
-
Allow to solidify: Let the agarose gel solidify at room temperature for 30-60 minutes. The gel will become firm and transparent when solidified.
-
Remove the gel comb: Once the gel is solidified, gently remove the gel comb by pulling it straight up. This will create the sample wells in the gel.
Your agarose gel is now ready for sample loading and electrophoresis analysis.
Microwave Heating: Simplifying Agarose Gel Preparation
Agarose gels play an indispensable role in molecular biology research, offering a versatile tool for separating and analyzing DNA, RNA, and proteins. While preparing agarose gels has traditionally involved heating and cooling protocols, the advent of microwave technology has revolutionized this process, offering a convenient and efficient alternative.
The Microwave Advantage
Harnessing the power of microwaves for agarose gel preparation offers several compelling advantages:
- Time Saving: Microwaving significantly reduces the heating time, allowing you to cast your gels in a matter of minutes instead of hours.
- Convenience: The entire process can be easily performed in a standard microwave oven, eliminating the need for specialized equipment.
- Safety: Microwave heating ensures more uniform heating, reducing the risk of localized overheating and gel damage.
Selecting the Appropriate Settings
To ensure the best results, careful attention should be paid to the microwave settings:
- Power: Use 50-75% of the maximum power to prevent boiling or excessive bubbling.
- Time: Heat the agarose solution in intervals, stirring between each heating period to prevent uneven heating.
Monitoring the Gel
During microwave heating, it’s crucial to monitor the gel to ensure optimal consistency:
- Avoid Ebullition: The solution should never reach a boiling point. If bubbles start to form, reduce the power or pause the heating.
- Achieving Gelation: After heating, let the solution cool slightly to allow it to gel. The gel should become translucent and solidify.
- Microwave Compatibility: Use glassware or containers specifically designed for microwave use to prevent breakage or contamination.
By following these simple guidelines, you can harness the convenience of microwave heating to effortlessly prepare agarose gels for your molecular biology experiments.
Loading the Samples: Accuracy and Precision
When it comes to agarose gel electrophoresis, meticulous sample preparation is crucial for successful DNA visualization. Loading buffer plays a pivotal role in this process. It serves as a “vehicle” that carries DNA samples into the agarose gel. It also contains dyes that bind to DNA, making it visible under ultraviolet light. The choice of loading buffer depends on the specific dyes used for staining.
Preparing samples for loading involves mixing DNA with the appropriate loading buffer. The ratio of DNA to loading buffer is critical. Too much loading buffer can obscure the DNA bands on the gel, while too little can hinder proper sample migration. Accurate measurements are essential, and micropipettes are commonly used to dispense precise volumes of DNA and loading buffer.
Tips for Accurate Sample Preparation:
- Use a high-quality micropipette that has been calibrated regularly.
- Set the micropipette to the correct volume and dispense slowly to avoid errors.
- Mix the DNA and loading buffer thoroughly by gently pipetting up and down.
- Load the samples carefully into the wells created in the agarose gel using a micropipette or a gel loading tip.
- Avoid touching the tips to the bottom of the wells, as this can introduce air bubbles that can interfere with electrophoresis.
By following these guidelines, you can ensure accurate and precise sample preparation, which is essential for successful agarose gel electrophoresis.