Comprehensive Guide To Creating Accurate Contour Maps: A Step-By-Step Tutorial
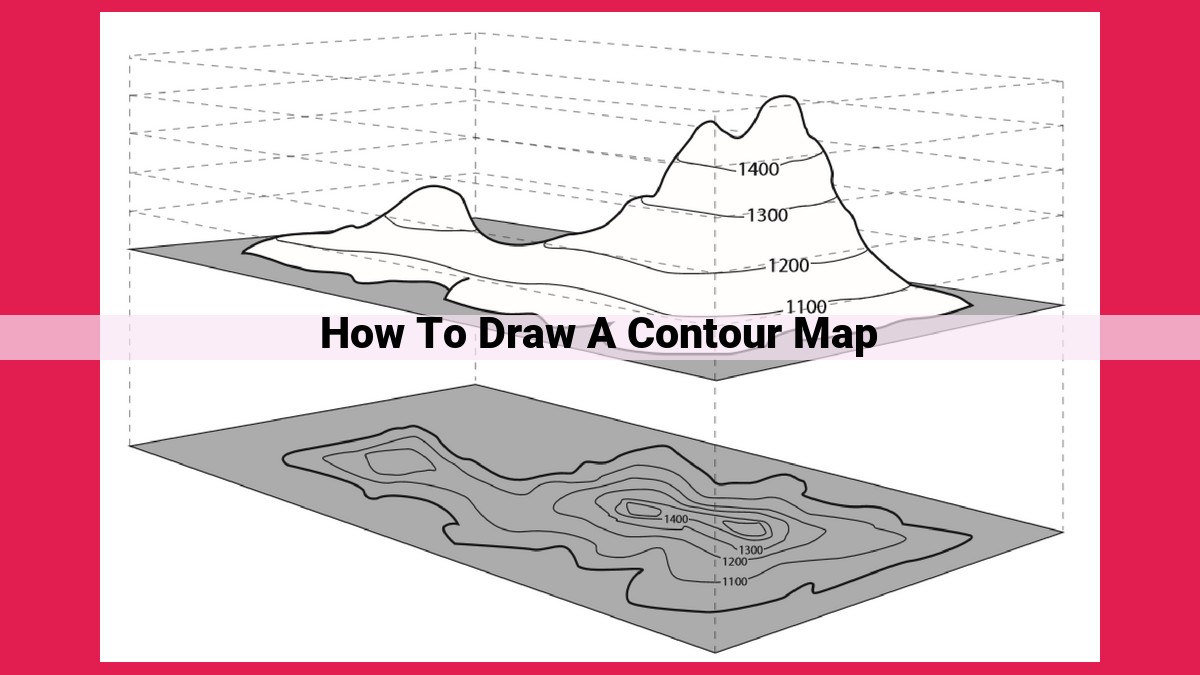
To draw a contour map, begin by understanding contour lines and their significance, including interpolation and extrapolation techniques for elevation estimation. Determine the contour interval and spacing based on elevation changes, and use these to represent the terrain’s slope and gradient. Include depression contours for below-sea-level areas, using dashed lines and hachures to indicate flow direction. Finally, gather elevation data, choose a contour interval, and follow step-by-step instructions for drawing index contours, connecting lines, and labeling elevations.
Understanding Contour Lines: A Foundation for Accurate Mapping
- Introduce the concept of contour lines as lines connecting points of equal elevation.
- Explain the significance of index contours with numerical values.
- Explore techniques for interpolation and extrapolation to approximate elevation values.
Understanding Contour Lines: A Foundation for Accurate Mapping
In the realm of cartography, understanding contour lines is crucial for precise map interpretation. These lines, resembling threads connecting points of equal elevation, provide a vivid portrayal of terrain relief.
Index Contours grace the map with numerical values, signifying the actual elevation at those points. By discerning the elevation differences between adjacent contour lines, we can deduce the steepness or flatness of slopes.
Interpolation and extrapolation empower us to estimate elevation values between and beyond contour lines. These techniques allow us to approximate the exact elevation of any given point on the map. This knowledge is invaluable for planning construction projects, predicting water flow, and navigating terrain.
Contour Interval and Spacing: Deciphering Elevation Changes
Contour lines, like invisible threads on a map, tell an intricate tale of elevation changes across landscapes. Understanding contour intervals and spacing is pivotal for navigators, explorers, and anyone seeking to delve into the mysteries of Earth’s topography.
The contour interval is the critical distance between adjacent contour lines, measured in elevation units (e.g., feet or meters). It’s like the “staircase height” of the landform. A smaller contour interval indicates more frequent elevation changes, resulting in a map with more closely spaced contour lines. This detail is ideal for capturing sharp slopes or complex terrain.
Conversely, a larger contour interval portrays gentler terrain with more widely spaced contour lines. It provides a broader overview of the elevation changes but may miss the finer details of the landscape.
To interpolate and extrapolate elevation values within contour intervals is an art form for map users. Interpolation involves estimating elevation values between contour lines, while extrapolation extends these values beyond the mapped area. By observing the contour gradient, or the steepness of the lines, we can make informed judgments about the elevation changes within and beyond the contour intervals.
For instance, a series of tightly spaced contour lines suggests a steep slope, while gradually spaced contour lines indicate a gentle slope. By interpolating elevation values based on these clues, we can paint a more accurate mental picture of the terrain’s contours.
Contour Gradient and Slope: Navigating Terrain Relief
Understanding the intricacies of contour lines empowers you to decipher the topography of a landscape. Contour gradient, a crucial aspect of contour maps, reveals the steepness or gentleness of terrain.
Contour Gradient: The Crux of Elevation Change
Imagine a contour map as a series of interconnected lines, each representing a specific elevation. The contour gradient measures the rate of elevation change between adjacent contour lines. For instance, tightly spaced contour lines indicate a steep gradient, while widely spaced lines suggest a gentle gradient.
Interpolation and Extrapolation: Unraveling the Puzzle
Determining elevation values between contour lines poses no challenge with the techniques of interpolation and extrapolation. Interpolation allows us to estimate elevation values within contour intervals based on the known elevations of neighboring contour lines. Extrapolation, on the other hand, extends this process beyond the given contour lines. By skillfully combining interpolation and extrapolation, we paint a detailed picture of the terrain.
Convex and Concave Slopes: Unveiling Terrain Character
The curvature of contour lines reveals the shape of the land surface. Convex slopes appear as contour lines bending outwards, indicating a rounded hilltop or mountain summit. Conversely, concave slopes exhibit contour lines curving inwards, signifying a valley or depression. These features provide invaluable information for planning navigation routes or understanding drainage patterns.
Dive into the Depths: Unraveling the Secrets of Depression Contours
Contour lines are the lifeline of mapping, painting a vivid picture of the terrain’s elevation. But what happens when the land dips below sea level? That’s where depression contours step in, venturing into the hidden depths of our planet’s surface.
Depression contours are the unsung heroes of mapping, connecting points that lie below the waterline. They are like subterranean explorers, guiding us through the underwater valleys and ridges that shape our coastal landscapes. These lines are often dashed or accompanied by hachures, small lines drawn perpendicular to the contour line indicating the direction of water flow.
By following the path of depression contours, we can understand the flow patterns of underground water, helping us predict the direction of groundwater movement and potential areas of flooding. They also provide crucial information for coastal management and planning, as they reveal the extent and depth of submerged areas, guiding engineers in designing structures to withstand coastal erosion and storm surges.
So, the next time you marvel at the intricacies of a contour map, don’t forget the role of depression contours. They are the hidden heroes, illuminating the unseen depths that shape our world.
Drawing a Contour Map: A Step-by-Step Guide to Terrain Mapping
Understanding the Basics
Before embarking on the map-making journey, it’s essential to grasp the fundamental concepts of contour lines. These lines connect points of equal elevation, providing a visual representation of the terrain’s topography. Index contours, adorned with numerical values, serve as crucial references for elevation changes. Through interpolation and extrapolation techniques, you can approximate elevation values between contour lines.
Choosing the Contour Interval
The contour interval, representing the vertical distance between adjacent contour lines, is a crucial decision. It dictates the level of detail on your map. For complex terrain, a smaller interval unveils more intricate elevation changes, while a larger interval provides a general overview. Consider the intended map scale and purpose when selecting the contour interval.
Drawing Contour Lines
With elevation data in hand, let the map-making commence. Begin by drawing index contours with numerical values. Then, using interpolation, estimate elevation values within contour intervals and draw additional contour lines to create a smooth transition. Extrapolation extends contour lines beyond existing data points to depict the terrain’s probable continuation.
Connecting Contour Lines
Connecting contour lines is an art form that requires careful attention. They should not intersect or cross each other, and their spacing should reflect the terrain’s gradient. Concave slopes have contour lines that curve inward, indicating lower slopes, while convex slopes exhibit outward-curving contour lines for steeper terrain.
Depression Contours
In the realm of below-sea-level mapping, depression contours come into play. These lines, depicted with dashed lines and hachures, represent areas lower than the map’s reference level. They indicate the direction of water flow and help visualize submerged landscapes.
Labeling Elevation Values
Lastly, label elevation values along contour lines to provide precise references for the terrain’s vertical dimensions. This step enhances the map’s readability and allows for accurate elevation determination at any point.