Accurate Radius Measurement Techniques And Tools For Objects
To measure the radius of an object, you can employ various tools such as rulers, calipers, micrometers, and radius gauges. Calipers are precise measuring devices that provide accurate radius measurements using their sliding jaws. Micrometers offer even higher precision, while radius gauges are specifically designed to measure the radius of curved surfaces. Additionally, consider factors like unit conversions and measurement techniques to ensure accurate results.
**Measuring Radius: A Comprehensive Guide**
Measuring the radius of an object is a fundamental skill in various fields, including engineering, construction, and manufacturing. This guide will delve into the different tools and techniques available for precise radius measurement, ensuring accurate results for your projects.
**Tools for Measuring Radius: Defining the Ruler’s Role**
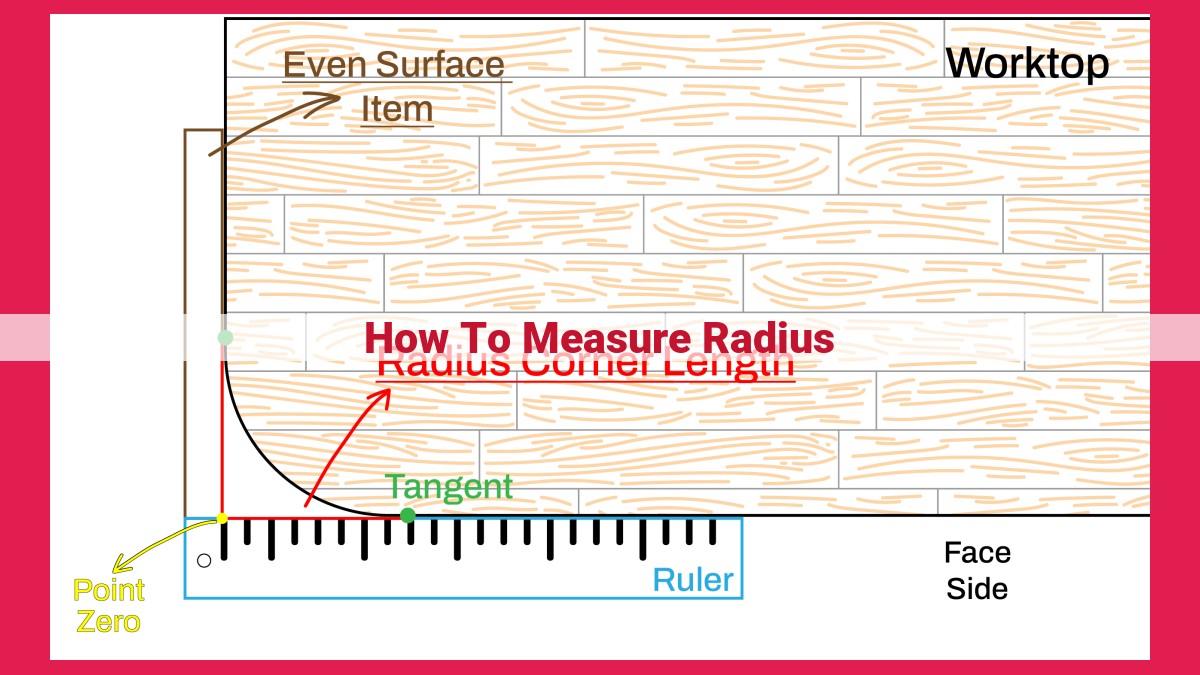
One of the simplest tools for measuring radius is a measuring ruler, tape, or yardstick. These tools are readily available and easy to use. By placing the tool on the edge of the object, you can directly measure the distance from the center point to the edge, providing a quick and convenient estimate of the radius.
However, rulers and tapes are limited in their accuracy, especially for small or irregular objects. They may also be difficult to use on curved surfaces. For more precise measurements, it’s best to explore other tools specifically designed for radius measurement.
Measuring Radius Using Calipers: A Comprehensive Guide
When tackling projects involving curved surfaces, accurately measuring the radius is crucial. Calipers, versatile tools used in engineering, woodworking, and other fields, provide a precise solution for this task. Let’s dive into the world of calipers and explore how they can help you conquer your radius-measuring challenges.
Types of Calipers
Calipers come in various types, each designed for specific applications.
- Vernier Calipers: These calipers feature a sliding scale that allows for precise readings down to 0.01 mm. They are ideal for measuring external and internal dimensions.
- Dial Calipers: Equipped with a rotating dial, dial calipers offer quick and convenient measurements with an accuracy of 0.01 mm or 0.001 inches.
- Digital Calipers: The most advanced type, digital calipers offer the highest accuracy and ease of use. They display digital readings, eliminating the need for manual calculations.
Step-by-Step Guide to Using Calipers
- Select the appropriate caliper type. Consider the size and shape of the object you’re measuring.
- Zero the caliper. Close the jaws completely and set the reading to zero.
- Position the caliper jaws. Place the jaws over the curved surface, ensuring they are perpendicular to the radius.
- Measure the radius. Read the measurement on the scale, dial, or digital display.
- Take multiple measurements. Repeat the measurement process at different points to enhance accuracy.
Accuracy Considerations
Accuracy in caliper measurements is influenced by several factors:
- Calibration: Ensure your calipers are properly calibrated to provide precise readings.
- Proper jaw positioning: Hold the caliper jaws firmly perpendicular to the surface to avoid erroneous readings.
- Operators skill: Practice using the calipers to develop proficiency and improve accuracy.
- Environmental conditions: Temperature and humidity can affect caliper performance. Use them in stable conditions.
Mastering the art of measuring radius using calipers empowers you with the ability to tackle a wide range of projects with precision. Remember, the key to success lies in choosing the appropriate caliper type, following the correct measurement techniques, and understanding the factors that influence accuracy. With a keen eye and steady hand, you’ll conquer every radius-measuring challenge that comes your way.
Measuring Radius Using a Micrometer:
- Types of Micrometers: Introduction to screw, dial, and digital micrometers.
- Measurement Technique: Instructions on utilizing a micrometer to measure radius precisely.
- Factors Affecting Accuracy: Understanding the factors impacting micrometer measurements.
Measuring Radius Using a Micrometer: A Comprehensive Guide
Measuring the radius of an object accurately is crucial in various fields, including engineering, manufacturing, and scientific research. Among the most precise tools for radius measurement is the micrometer, a specialized instrument designed to determine incredibly small distances. This guide will delve into the world of micrometers, exploring their types, measurement techniques, and factors affecting their accuracy.
Types of Micrometers
Micrometers come in three primary types:
- Screw Micrometer: The most common type, consisting of a screw with a precise thread pitch and a thimble with graduations.
- Dial Micrometer: Features a dial with a rotating pointer that indicates the measurement, offering greater readability.
- Digital Micrometer: The most advanced type, displaying the measurement digitally on a screen.
Measurement Technique
To measure the radius of an object using a micrometer:
- Zero the Micrometer: Rotate the thimble counterclockwise until the anvil and spindle touch, and the zero mark aligns with the reference line.
- Position the Object: Place the object between the anvil and spindle, ensuring it is centered.
- Measure the Object: Slowly rotate the thimble clockwise until the spindle gently touches the object’s surface.
- Read the Measurement: The measurement is the sum of the reading on the thimble and the reading on the micrometer’s barrel.
Factors Affecting Accuracy
Several factors can influence the accuracy of micrometer measurements:
- Calibration: It is essential to ensure that the micrometer is properly calibrated to provide accurate readings.
- Environmental Conditions: Temperature variations can affect the expansion of the micrometer’s components, leading to measurement errors.
- User Skills: Proper handling and techniques are crucial for avoiding errors caused by incorrect measurement practices.
Utilizing a micrometer is a precise and reliable method for measuring the radius of an object. By understanding the different types of micrometers, following the proper measurement technique, and considering the factors affecting accuracy, you can obtain accurate and consistent results in your radius determination tasks.
Measuring Radius Using a Radius Gauge: A Comprehensive Guide
Measuring the radius of curved surfaces or objects with precision is essential in various fields. One versatile and widely used tool for this purpose is the radius gauge. Let’s dive into the different types of radius gauges, how to select the right one for your application, and the techniques involved in using them effectively.
Types of Radius Gauges
There are three primary types of radius gauges:
-
Feeler gauges: Consist of a set of thin, flexible blades of varying thicknesses. By inserting the blades between the curved surface and a reference point, you can determine the closest blade that fits snugly, indicating the approximate radius.
-
Pin gauges: Comprise a series of cylindrical pins of different diameters. Similar to feeler gauges, you insert the pins into the curved surface until you find the one that matches the radius closely.
-
Gap gauges: Feature a series of stepped bars or blades with varying gaps. By placing the gauge against the curved surface, you can measure the radius by aligning the widest gap that fits snugly without overlap.
Gauge Selection
Choosing the appropriate radius gauge depends on the following factors:
-
Radius range: Determine the approximate radius of the surface you need to measure. Some gauges have specific radius ranges, while others may cover a wider spectrum.
-
Accuracy requirements: Consider the precision required for your application. Pin gauges provide higher accuracy than feeler gauges, while gap gauges offer a good balance between accuracy and ease of use.
-
Material and shape: Choose a gauge material suitable for the surface you’re measuring (e.g., plastic, metal) and a shape that allows for convenient access to the curved area.
Techniques for Use
Feeler Gauges:
- Insert the feeler blades between the curved surface and a reference point, such as a straight edge or flat surface.
- Gradually increase the blade thickness until you find the one that fits snugly without bending or tearing.
- Read the thickness of the inserted blade to obtain the approximate radius.
Pin Gauges:
- Align a pin perpendicular to the curved surface.
- Insert the pin until it touches the surface at two points.
- The diameter of the inserted pin corresponds to the radius of the surface.
Gap Gauges:
- Position the stepped bars of the gap gauge against the curved surface.
- Identify the widest gap that fits snugly without overlapping the surface.
- Measure the distance between the contact points of the widest fitting gap to determine the radius.
Tips for Accurate Measurements:
- Ensure the radius gauge is perpendicular to the curved surface.
- Avoid using excessive force when inserting blades or pins to prevent damage to the surface or the gauge.
- Clean the gauge and the curved surface before measuring to eliminate any debris or impurities that may affect accuracy.
- Use multiple measurements and average the results for improved precision.
A Comprehensive Guide to Measuring Radius: Techniques and Tools
In the world of precision measurements, accurately determining the radius of objects is crucial for a wide range of applications, from engineering and manufacturing to art and design. This guide delves into the various techniques and tools available for measuring radius effectively.
Tools for Measuring Radius
-
Measuring Ruler, Tape, or Yardstick: For basic radius measurements, these tools provide a quick and easy solution. Simply place the measuring device along the edge of the object and read the measurement at the center point. However, their accuracy is limited, especially for small radii.
-
Measuring Calipers: Calipers, with their precise jaws, are the go-to tool for measuring the radius of cylindrical or spherical objects. Whether it’s a Vernier caliper, a dial caliper, or a digital caliper, each type offers its own advantages in terms of accuracy and ease of use.
Using Calipers for Radius Measurement
-
Types of Calipers:
- Vernier calipers: Feature a finely graduated scale for precise readings.
- Dial calipers: Provide a dial indicator for easy and accurate measurements.
- Digital calipers: Offer digital readout for convenience and speed.
-
Step-by-Step Guide:
- Adjust the calipers to make light contact with the object’s surface.
- Align the inner jaw of the calipers with the center of the object.
- Read the measurement on the scale, dial, or digital display.
Measuring Radius Using a Micrometer
Micrometers are indispensable for high-precision radius measurements. Their fine threads and precision scale allow for accurate readings down to thousandths of an inch or millimeters.
-
Types of Micrometers:
- Screw micrometers: Require manual adjustment of the thimble.
- Dial micrometers: Offer a dial indicator for easier reading.
- Digital micrometers: Provide digital readout for convenience and speed.
-
Measurement Technique:
- Clean the anvil and spindle surfaces of the micrometer.
- Position the object on the anvil and close the spindle until it lightly touches the surface.
- Read the measurement on the scale, dial, or digital display.
Measuring Radius Using a Radius Gauge
Radius gauges come in various forms, each suited to specific applications.
-
Types of Radius Gauges:
- Feeler gauges: Consist of a set of thin blades of varying radii, useful for measuring inside and outside radii.
- Pin gauges: Have a series of cylindrical pins of different diameters, suitable for measuring external radii.
- Gap gauges: Feature a series of angled blades that measure the gap between two surfaces, which can be calibrated to determine radius.
-
Gauge Selection: Consider the size, shape, and accessibility of the object when selecting the appropriate radius gauge.
Additional Tips and Considerations
-
Principles of Radius Measurement: Understanding the concept of radius as half the diameter of a circle is essential for accurate measurement.
-
Unit Conversions: As measurements may be expressed in different units (e.g., inches, centimeters), be sure to convert between units as needed.
-
Measuring Irregular Shapes: For objects with complex or irregular shapes, approximate the radius by measuring the distance from the center point to multiple points around the edge and averaging the results.
